
A European BESS builder once showed our engineers MCT system samples that looked flawless yet jammed in his frame IP68 ingress test 1. One wrong dimension can stall a whole project.
When receiving MCT system samples, inspect four things: frame and module dimensions against your existing 120-frame cutout, certification documents for fire, IP68 and pressure ratings, EPDM sealing performance across the cable diameter range, and a full dry-fit assembly to confirm drop-in compatibility before any purchase order.
Each of those four checks answers one question a skeptical purchasing engineer would ask. I will walk through them in order. I will also show you which tests are worth your bench time and which ones only damage the sample.
How do I verify dimensional compatibility with my existing 120-frame cutouts before installation?
Our QC team measures every frame twice before a validation sample leaves Shaanxi. Still, your own bench check matters, because your cutout may not match the nominal drawing.
Verify dimensional compatibility by measuring the sample frame's outer width, height, depth and bolt-hole pattern with calipers, comparing them to your existing cutout and the manufacturer's drawing, then dry-fitting the frame, stay plates and modules into a spare cutout to confirm clearance and even compression.

Dimensional tolerance is the first gate. A cable penetration seal only works when the frame sits square in the cutout and the modules stack to the exact internal height. If either number drifts, the compression wedge assembly cannot close, or it closes with uneven pressure. Both outcomes leak.
Start with the drawing, not the sample
I always ask buyers to lay three documents side by side. First, their current supplier's frame drawing. Second, the as-built cutout dimensions from their container or switchgear panel. Third, our drawing for the equivalent TSR or TSC model. Many failures are not caused by the sample. They come from a site cutout that was already out of tolerance, and the incumbent frame was simply forced in. A second source will not fix that. Measuring reveals it.
What to measure and how
| Feature | Tool | Compare against | Why it matters |
|---|---|---|---|
| Frame outer width and height | Digital calipers or steel rule | Cutout and drawing | Frame must seat without forcing |
| Frame depth (module direction) | Calipers | Drawing | Sets module packing depth |
| Internal packing height | Calipers | Sum of module heights + stay plates + wedge | Wrong sum means no compression |
| Bolt-hole pattern and diameter | Pin gauges or calipers | Existing fixing holes | Confirms reuse of drilled holes |
| Module width | Calipers | 120-frame standard width | Modules must slide in without gaps |
| Stay plate thickness | Calipers | Existing stay plates | Stay plate alignment depends on it |
Measure at three points along each edge, not one. Frames can be square at the ends and bowed in the middle. Weld seams on galvanized frames should be checked for spatter that adds thickness at corners.
Then dry-fit everything
Insert the modules, stay plates and wedge into a spare cutout or a test plate. Tighten the compression bolts by hand only. Watch the module faces. They should bulge evenly across the whole stack. If one corner bulges first, either the frame is out of square or the module stack height is off. In our experience shipping to modular data center builders, a dry fit takes fifteen minutes and catches more problems than any amount of paperwork.
What certification and test documents should I request to confirm fire, IP68, and pressure ratings?
A sourcing manager in Germany once told me he would not read a single spec line until he saw our type approval certificate. I respected that.
Request the type approval certificate, fire test report showing the A-0 or A-60 rating, IP68 ingress test report, watertight and gas-tight pressure test records covering 0.01–0.4 MPa, ISO 9001 and IATF 16949 certificates, a certificate of conformity, and material traceability records for the EPDM batch.

Documents fall into three groups. Some prove the product design was tested. Some prove the factory can repeat that design. Some prove the specific batch in your hands matches the tested design. You need all three, and buyers often only ask for the first.
The document checklist
| Document | What it proves | Red flag if missing |
|---|---|---|
| Type approval certificate (e.g. BV) | Independent body reviewed design and testing | No third-party verification |
| Fire rating certification (A-0, A-60) | Fire integrity per SOLAS requirements 2 class divisions | Cannot be used on rated bulkheads |
| IP68 test report | Dust and continuous water immersion protection | Outdoor BESS enclosures at risk |
| Water tightness pressure test record | Sealing at stated pressure and hold time | Leak path under head pressure |
| Gas tightness test record | Sealing against gas migration | Critical for battery off-gas zones |
| ISO 9001 and IATF 16949 3 certificates | Repeatable quality system | Sample may not represent production |
| Certificate of conformity | This shipment matches the order | No link between paper and parts |
| Material traceability record | EPDM 4 batch, halogen-free declaration | Cannot trace a future field failure |
Read the scope, not just the title
A fire certificate is only useful if the tested configuration matches yours. Check the frame type, module type, cable fill and orientation listed on the certificate. Some projects call for H-120 hydrocarbon fire ratings or blast certificates. Our A-0 and A-60 ratings cover steel bulkhead and deck classes. If your specification needs more, ask before the sample ships, not after.
Do I need my own pressure test?
Here is a common objection. Buyers ask whether they should hydrotest the sample themselves. Industrial sampling lines are often tested at 1.5 times design pressure with a 10-minute hold, and that model works well as a reference. But a standard cable transit with no fluid-barrier duty does not need it. Match the test to the duty. If your container wall sees standing water or off-gas, request our pressure records first, then run a confirmation test at your own specified pressure. If it is a dry indoor control panel, a certificate of conformity and the dry fit are enough.
How do I check EPDM module sealing performance across different cable diameters in one sample?
Softer rubber seals faster but sets sooner; harder rubber lasts but needs more torque. We tuned our step-core EPDM between those two limits, and you can check it yourself.
Check sealing performance by peeling the step-core layers to match three cable diameters at the low, middle and top of the module's stated range, compressing each in the frame, plus a Shore A hardness test, a 24-hour compression-set recovery check, and a pressure test at your specified duty.
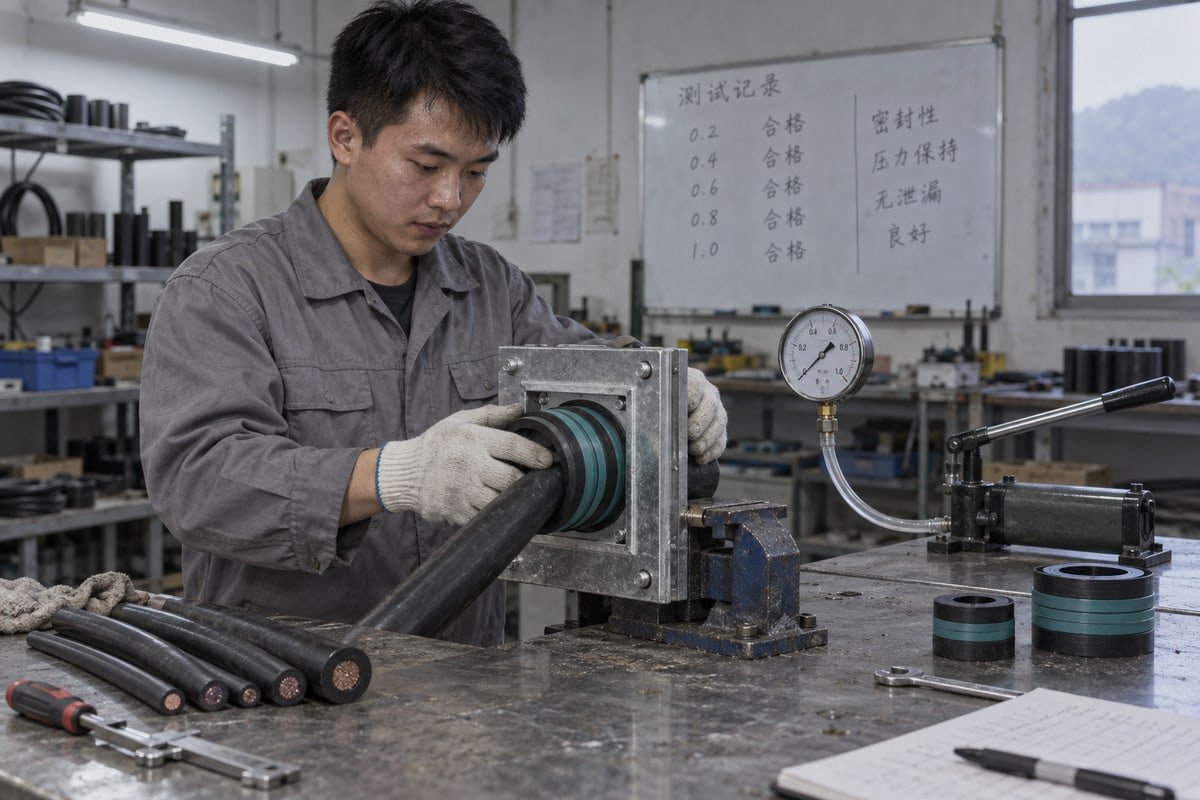
The whole point of a step-core module is range. One module size covers several cable diameters. That flexibility is also where a weak sample hides its faults. A module can seal perfectly at its largest diameter and leak at its smallest, because the thin remaining core layers matter most there.
A five-step bench procedure
- Read the diameter range stamped on the module. Choose one cable at the smallest permitted diameter, one in the middle, and one at the largest.
- Peel the step-core layers for the smallest cable. Inspect each peeled layer. The layers should separate cleanly with no tearing and no residue on the core face.
- Insert the module into the frame with the correct stay plates. Tighten the compression wedge assembly to the drawing torque. Look for rubber extruding past the frame edge, which signals over-compression or a soft compound.
- Repeat for the middle and largest diameters using fresh modules from the same sample bag.
- If your application requires it, run a water tightness pressure or gas tightness test at your specified level. Do not exceed it. Over-testing deforms seals and gives you a false failure.
Material checks that go beyond fit
Shore hardness testing takes seconds with a Shore A durometer 5. Measure on a flat face, away from the grommet rings, and take several readings. Compare against the data sheet value. A reading well outside that range points to a different compound or a poorly cured batch.
Compression set matters for extreme climates. Compress one module at the drawing torque, hold it 24 hours, release it, and measure how much thickness it recovers. Good halogen-free rubber recovers most of its height. A module that stays flat will lose sealing force after the first hot summer in a Middle East container yard.
Finally, check chemical compatibility. Place a module in contact with a cut piece of your actual cable jacket for a few days. Look for tackiness or swelling on either surface. Plasticizer migration between PVC jackets and rubber is slow, but it is real, and a sample check costs nothing.
What inspection steps confirm a sample is truly a drop-in replacement for my current supplier's model?
Early in our export work, we learned that a matching part number means nothing until the module slides into a competitor's frame and the wedge closes.
Confirm drop-in status with a five-step check: match the model cross-reference table to your current part numbers, verify frame and module dimensional tolerance, dry-fit modules with your existing stay plates and compression wedge assembly, confirm identical spare capacity layout, and compare certification scope line by line.

Drop-in is a strong claim. It means you can mix our modules into an existing frame today, and reorder spares from either source tomorrow, without a new drawing or a new certificate review. Here is how to prove it rather than trust it.
Compare, do not assume
| Check | Current supplier part | DEWIN sample | Pass criterion |
|---|---|---|---|
| Model cross-reference | Existing model number | Listed equivalent | One-to-one match in the table |
| Module external dimensions | Measured | Measured | Within stated tolerance |
| Diameter range per module | From data sheet | From stamp | Equal or wider range |
| Stay plate thickness and lugs | Measured | Measured | Interchangeable in the same frame |
| Wedge closed height | Measured | Measured | Same packing calculation |
| Spare capacity layout | Blank modules count | Blank modules count | Same future cable additions |
| Certification scope | Fire, IP68, pressure | Fire, IP68, pressure | Equal or better, same configuration |
Run the mixed-frame test
The single most convincing check is a mixed stack. Take your existing frame. Remove one row of the incumbent modules. Insert our modules in that row, keep the incumbent stay plates, and close the incumbent wedge. Then reverse it. Put one row of incumbent modules into our frame. If both stacks compress evenly and pass your dry-fit inspection, you have real interchangeability. Every time we send free validation samples to a switchgear builder, this is the test we ask them to run first.
Check the kit, the labels and the files
Count the assembly kit. Stay plates, compression wedges, blank modules and the manufacturer-approved lubricant should all be present. A missing lubricant tube seems minor, but it changes the friction and the effective compression. Check that markings on the frame nameplate and module stamps are legible and match the delivery note. Some buyers now ask for QR codes on frames for asset tracking. If that is in your specification, verify it is present and scans. Likewise, if your specification calls for EMC shielding layers in the modules, confirm that requirement is in writing and covered by a separate test document. Not every transit needs it.
Finally, request the CAD or STEP file and overlay it on your current frame model. A two-minute overlay in your design software will show any interference before a single frame ships. If anything fails, quarantine the sample, write a nonconformance note, and send it to our English technical support with photos. That record becomes part of your supplier qualification file.
Conclusion
A sample that looks right can still fail at installation. Measure it, read its certificates, test its seals, and dry-fit it. Then qualify your second source with confidence.
Footnotes
1. Wikipedia explains the IP Code standard used to rate dust and water ingress protection. ↩︎
2. Background reference for the international maritime safety convention governing fire class divisions. ↩︎
3. ISO is the authoritative source defining these quality management system standards. ↩︎
4. Wikipedia background on EPDM rubber material properties relevant to sealing performance testing. ↩︎
5. ISO standard reference for the durometer hardness testing method mentioned for EPDM rubber. ↩︎



 English
  Español de México
  Deutsch
  Français
  العربية
  Русский